I’ve bought a space in my kitchen

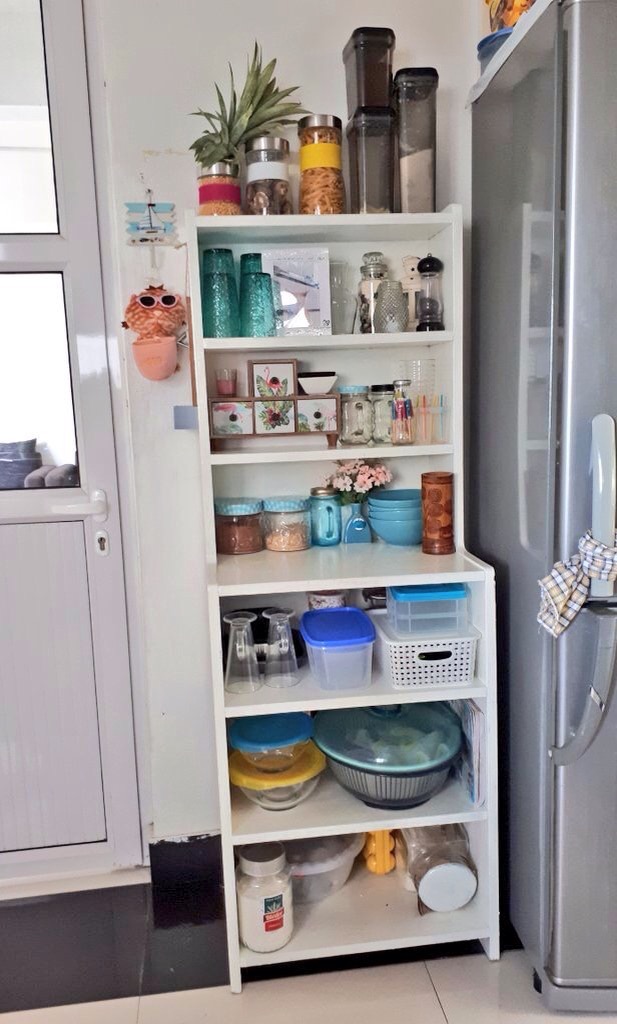
Did I just wrote “bought a space in my kitchen”, yes I did negotiated with my parents for a little corner to keep my personal kitchen accessories! My dad has brought for me a second-hand bookshelf which was left unused since years. A good way to recycle!!!!! Its a wooden shelf, which I have painted white because my kitchen is black and white. I also feel that white furniture for the kitchen area brings a positive and vibrant note to stock colorful kitchen jar containers, glasses and even more decorative stuffs. White allows you to perfect any theme you are planning to get your kitchen into. 

“Tropical beach” decor is my inspiration! I went to a few shops in Rose-hill to buy kitchen accessories to make my little corner more of a coastal space. You can create your own beach at home, if you only know how to play with each decor accessory, furniture, color palette and lights. These little beach touches depict a reflection of your personality! A little beach rustic hanging hook frame to a wooden vintage bottle opener with the blue and white hues on the shelves at the center of attention and the light of the sun reflecting peacefully on them. This little beach shelf will turn you into an enthusiastic sailor, ready to set its anchor onto my kitchen shelf to discover every little simple details. Don’t worry its really a low-budget creativity because ornate decorations have never inspired me. 

– – – – – – – – – – – – – – – – – – – – – – – – – – – – – – – – – – – – – – – 

From top till bottom, there is not much of the same pattern stuffs, some are of different colors, but that’s what keep the shelf elegant and affordable. Beach in any decor needs to bring a note of vibrance, calmness, relaxing mood and beautiful. The top of the shelf consisted not much of anything except beautiful glass containers to store pasta, mushrooms, milk powder, sugar and tea.. The first three colorful jars are affordable from Concept- Yves Rocher and amazingly the pines of a pineapple I have chosen to crown on the smaller jar. Second shelf shelters my beach design glasses (Bought at Chong & Sons, Rose-hill), my handcrafted photo frame of beloved cat Pooky Chewingum, a juice jar, scented artificial flowers in a jar, candles and pepper shaker. What is more best to have onto the third shelf ohet than a cute tropical drawer set from Mr Bricolage, a beautiful gift from my Azhar to store some medicines, tea bags flavours and other things. Next to the drawer, some awesome travel jars, a milkshake glass and popsicle moulds.The next shelf offers me with  a table space design, plenty of space to put a bar stool and turn that corner into a minimalist table. Two beautiful light blue containers, another travel jar, flower vase and bowls took a smaller part out of the bigger space. 


How do you like the shelf so far? The next three coming shelves are not beautifully decorated but they hold precious utensils; a few baking trays, food containers, cappucino glasses for a couple, a loving basket holding forks, spoons  and juice mocktail beach decorations. Next shelf holds very little kitchen accessories; a mixer, more food containers from Concept-Yves Rocher,  a basket of biscuits & snacks and my beach cover recipe book. Last shelf shelters my baking tools, more baking trays, eggs holder and flour. 


The side of the shelf  displays a rustic bottle opener frame and next to it on the wall a beach hook frame holding my fluffy tabby cat which resembles so much my cat Pooky Chewinggum. 


Sauteed mixed veggies with olives

Do you also fancy sauteed mixed veggies as the perfect side dish for your roasted/fried/breaded fish,chicken or meat? I do love to add a touch of green with some olives. I prefer frozen packed veggies because they are best in taste and contain more fibre, vitamins and antioxidants compared to fresh ones because frozen veggies are sealed and snapped frozen once they have been  harvested from the agricultural fields. Have you ever noticed that frozen veggies are more tasty, flavorful and they give a higher concentration of nutrients than fresh veggies? Well I’m not saying to not purchase fresh veggies, both have their benefits and drawbacks but for a quick meal preparations, I would say opt for frozen veggies.

– – – – – – – – – – – – – – – – – – – – – – – – – – – – – – – – – – – – – – – – – – – –

Ingredients:

  • 1 cup frozen beans
  • 1 cup frozen broccoli
  • Green olives
  • Black olives
  • 1 tbsp garlic paste
  • 10cl water
  • Vegetable oil
  • Salt and pepper

Preparations:

1. Soak frozen veggies into water 30minutes prior to cooking. 

2. Heat pan with oil over medium heat, add the beans, broccoli and garlic paste. Cook for 3minutes, lid covered. 

3. Add water, season with salt and pepper and allow to cook for 1minute, lid covered.

4. Add the olives and cook for 2minutes, lid covered.

Breaded fish

A rustic, quick and simple dish, often on our saturday dinner table at home. I love breaded fish because since my childhood I always took breaded fish as similar to crispy fried chicken haha… well not anymore but still both are even succulent when accompanied with bread, mixed veggies (click to link on recipe) and french fries. I would recommend serving this delicious fish platter with a good quality mayonnaise sauce. Simple as it is, season the mayonnaise with a pinch of lemon juice and zests, salt and pepper. Most locals on our little island prepare their breaded fish in the same style, I know across the globe there has been different styles of implementing various type of cuisines.

– – – – – – – – – – – – – – – – – – – – – – – – – – – – – – – – – – – – – – – – – – – –

Servings: 4-5

Ingredients:

  • 500g fish fillets
  • 1 tbsp garlic paste
  • 1 tbsp lemon juice
  • 1 tbsp paprika powder
  • Thyme leaves
  • 1 egg, beaten
  • 1/2 cup self-raising flour
  • 1/2 cup breadcrumbs
  • Vegetable oil
  • Salt and pepper

Preparations:

1. Into a bowl, season the fish fillets with garlic paste, thyme leaves, lemon juice, salt and pepper. Allow to rest for 10 minutes. 

2. Heat a deep skillet pan with vegetable oil over medium heat. Meanwhile combine flour, breadcrumbs and paprika powder together.

3. Dip each fish fillets into egg, then coat them into the dry ingredients mixture. Shake off any excess and add gently into pan. Deep fry for 5 minutes on each side.

Serve with mayonnaise sauce, chilli paste and as side dish with bread, mixed veggies (click to link on recipe) and french fries.

Cheese Naan Bread & tomato ground Beef Naan Bread

IMG_-oc1w2i

A light and comforting food for breakfast, evening tea time and especially for suhoor during Ramadhan. This naan bread is a version of how most locals in Mauritius make this recipe. You can add anything you love for the filling inside the bread; cheese, sauteed chicken and ground beef work best. I have shared the recipe for Mauritius style tomato ground beef below, you can use same method for tomato chicken as well. 

– – – – – – – – – – – – – – – – – – – – – – – – – – – – – – – – – – – – – – – – – – – –

Ingredients for naan bread:

  • 230g self-raising flour
  • 1 small packet dry active yeast
  • 1 tbsp salt
  • 1 tsp salt
  • 5 tbsp unsalted butter, melted
  • 1 egg
  • 1 cup warm water
  • Egg wash, mix 1 egg with 1 tbsp liquid milk
  • Sesame seed
  • Parsley leaves
  • Cheddar Cheese and Mozarella (You can use any cheese you prefer)
  • Vegetable oil

Ingredients for ground beef:

  • 1 pound ground beef
  • 1 large green bellpepper
  • 1 onion
  • 1 cup tomato puree
  • 1 tbsp garlic and ginger paste
  • 1 tbsp paprika powder
  • 1/2 tsp chilli powder (optional)
  • 1 tsp coriander powder
  • Vegetable oil
  • Salt and peppet

Preparations for ground beef:

1. Into a saucepan, heat vegetable oil over medium heat and add the onions and bellpepper. Allow to cook until onions turn translucent, add the ground beef, ginger and garlic paste, paprika, chilli and coriander powder. Cook for 10 minutes.

2. Pour tomato puree, season with salt and pepper and cook for another 10 minutes, lid covered. Stove off and allow to cool down, lid uncovered.

Preparations for naan bread:

naan

1.  Add 1 tsp salt and dry active yeast into a cup of warm water, mix and allow to rest for 5 minutes until yeast has dissolved.

2. In another bowl, combine flour, salt, melted butter, egg and 1 tbsp salt together, using your hands. Knead the dough onto your kitchen table, while constantly dusting lightly the surface with flour so that the dough does not stick onto the kitchen table. Once done, the dough should not be sticky or wet. In another bowl, rub vegetable oil and place the dough. Oil the dough lightly, cover the bowl for around 30-45 minutes until the size of the dough has risen.

3. Flour your kitchen table, knead dough again to divide into half, using a pastry cutter or sharp knife. Divide both pieces of dough into half again. At this point you can choose the portion sizes of your bread by cutting the dough into half again. 

4. Roll out each dough vertically with the palms of your hands, until it increases in height (dislayed in 4th picture). Cut into half again and roll each one vertically, with width 4cm and fill the middle of the dough with cheese or sauteed ground beef, make sure it is not hot (displayed in 3rd picture). Close both ends of the dough and shape into spirals (displayed in 5th picture). Preheat oven at 180C.

5. Brush each with egg wash and sprinkle sesame seeds on top. Bake at 180C for 25-30 minutes.

Spaghetti Bolognese with chicken balls and mussels

IMG_-9ub28l
We all love Spaghetti Bolognese, topped on with parsley leaves and parmeasan cheese. It is a quick dish, with each bite filled with delicious flavours, perfect during the week after a long tired day at work or as a slow cooked meal during the week-end for lunch or dinner. The sauce is thick, with the chicken balls and mussels, the taste becomes rich and comforting. 

I have used chicken, you can substitute with beef and shrimps by using the same ingredients and process for the chicken balls in the first list. Lobster is also a combo for this dish. I have used tomato and chilli chutney to accompany this dish because amongst many Mauritius families it is a tradition to drizzle this chutney on pasta dishes.

– – – – – – – – – – – – – – – – – – – – – – – – – – – – – – – – – – – – – – – – – – – –

Ingredients:

For the chicken balls:

  • 2 chicken breasts, crushed in blender
  • 1 tsp paprika powder
  • 1 tsp tikka powder
  • 1 tsp lemon juice
  • 1/2 tsp soy sauce
  • 2 tbsp garlic paste
  • Pinch of honey drizzle
  • Breadcrumbs
  • Vegetable oil

For the Bolognese sauce:

  • 500g Spaghetti, cooked
  • 20 mussels
  • 2 carrots, finely minced
  • 3 celery sticks, finely minced
  • 1 large onion, finely chopped
  • 1 can peeled tomatoes
  • 6 cherry tomatoes
  • 2 tbsp Panzani Mushroom sauce (optional)
  • Thyme leaves
  • Celery leaves
  • 1 tsp garlic paste
  • 1 tsp dried oregano
  • 1/2 tsp paprika powder
  • 15cl water
  • Olive oil
  • Salt and pepper

Preparations:

1. Marinate the crushed chicken with the spices in the first list. Set aside for 30 minutes.Scoop out chicken with a spoon to evenly size each balls. Dip each chicken balls into breadcrumbs. Meanwhile preheat your pan with vegetable oil and deep fry chicken for 4-5 minutes on medium heat, constantly keep stirring.

2.Preheat your pan with oilve oil over medium heat. Add the onions, carrots, celery and garlic paste, allow to cook until onions become translucent in colour. Pour the can tomatoes, cherry tomatoes, Panzani mushroom sauce, water, thyme and celery leaves, dried oregano and paprika powder. Cook for 3 minutes, lid covered on medium heat. 

3. Season with salt and pepper. The chicken balls go into the sauce for another 2 minutes, lid covered. 

4. Scrub the shells of the mussels, clean and rinse well. Soak the mussels into water. The mussels go into the sauce. Make sure they are covered into the sauce. Simmer for another 5 minutes. Get rid of the closed mussels. Garnish parsley leaves, parmeasan cheese on top and serve with tomato and chilli chutney

Holiday season: Mussels and grilled king Prawns in butter lemon and herbs sauce

IMG_20181210_142433
An elegant and pricey seafood platter for your holiday table or any other special occasions. The best appetizer to have before the main dish. This recipe is easy, now I know if you fancy the restaurant style of this dish, then the price has always been skyrooted. I love the feeling of dipping toasted bread into the succulent butter lemon and herbs sauce, and those little forks inside the mussel shells sank with the sauce. 

– – – – – – – – – – – – – – – – – – – – – – – – – – – – – – – – – – – – – – – – – – – –

Ingredients:

For the grilled king prawns:

  • 500g king prawns, cleaned with shells
  • 1 tsp garlic paste
  • 1 tbsp paprika powder
  • 1 tbsp lemon juice
  • 1/2 tsp honey (optional)

For the butter lemon sauce:

  • 15-20 pieces of mussels
  • 1/2 cup unsalted butter
  • 15 cl shrimp stock
  • 15 cl Cooking cream (I use Elle & Vire brand)
  • Pinch paprika powder
  • 2 garlic cloves, peeled and grated
  • 1/2 tsp chilli flakes
  • 1 tbsp corn flour (optional)
  • 1 tbsp lemon juice
  • 1 tsp lemon zests

Preparations:

1. Into a bowl, mix all the spices in the first list together. Make the sure the shells are open vertically in half, rub the mixture on the skin of the prawns. Set aside and allow to marinate for 1 hour. Preheat a skillet or grill pan with oilve oil and cook prawns for 5 minutes on each side over medium heat.

2. Scrub the shells of the mussels, clean and rinse well. Soak the mussels in water. Into a pan over medium heat, add 1/2 cup of butter and grated garlic. After 10 seconds, add the remaining ingredients in the second list. Cook for 2 to 3 minutes. 

3.Add the tiger prawns first into the butter lemon sauce. Cook for 1 to 2 minutes, constantly keep stirring, lid covered.

4. Remove the prawns from the sauce, set aside and stove off. Into a deep pot with hot water allow the mussels to boil for 5 minutes on medium heat until shells are opened (now this process is optional, you can choose to cook them directly into the butter lemon sauce as well).  Get rid of the mussels who have stayed closed. Add the mussels into the butter lemon sauce and cook for 1 to 2 minutes. Add the prawns together with the mussels. Stove off and garnish on top with more parsley leaves. 

Vanilla & Lemon Sponge Cake with Coconut Cream frosting

20181119_170229

If you know me then you would know I’m fond of chocolate cake and vanilla or chocolate genoise cake only. But I have always wanted to try baking a vanilla sponge cake to see whether my favorite cake can change but NO.. Despite the cake was decadent and brushed in amazing texture, I would still maintain my old favorites on top of my favorite cake lists. I have added lemon zests and juice to the cake to add some more flavour or in the hope that it might become my favorite. You have to try this recipe because it is easy to bake and this is the part I have loved the most about this Vanilla & Lemon Sponge Cake. Unlike other cakes, you don’t require too many extravagant ingredients or cake decorating skills. 

It might not be as light and fluffy like other cakes, but this is what a sponge cake should be. Each bite is moist and packed with vanilla and lemon flavour. The perfect cake to bake if you are expecting families and friends for tea.

– – – – – – – – – – – – – – – – – – – – – – – – – – – – – – – – – – – – – – – – – – – –

Ingredients:

  • 150g of all-purpose flour
  • 50g granulated sugar (Quantity depends on your preferences)
  • 4 eggs
  • 15ml of milk
  • 1/2 cup of melted unsalted butter
  • 1 tbsp vanilla extract
  • 1 tbsp lemon juice
  • 1  tsp lemon zests
  • 1 tsp baking powder
  • Pinch of salt
  • 1can (160ml) of coconut cream  (Store into the refrigerator)

Preparations:

1. Preheat oven to 350F. Into your mixer bowl, whisk on high speed the eggs and sugar until they become thick and almost while in colour.

2. Into a bowl, combine flour, baking powder and salt, sift the dry ingredients into the batter in small batches, thus making sure to fold everything gently with a spatula until all dry ingredients is added. Add the milk, melted butter, lemon zests and juice into the batter, fold gently.

3. Line your round cake pan with parchment paper, without greasing the sides. Pour the batter into the cake pan and bake until golden brown for 15-20minutes. 

4. Once our from the oven, allow to cool down completely before brushing the coconut cream on top. The cake will absorb the coconut cream frosting, enabling the cake to have more flavour.

Apple, Pear, Mandarin Orange and Parsley Juice

Blog topics: Hydrate yourself during Summer!

Homemade fresh juice, aboslutely refreshing and filled with vitamins and fibers. Tip for you: never get rid of the fibers. I have seen many juice machines straining the fibers away which is very bad! Use your ordinary blender or mixer to crush the fruits and its fibers smoothly! Revitalize your body with fresh fruits. Best way is to turn them into juice incase you hate eating them or you are too busy! Add your favorite fruit depending on your preferred flavour and create your wonder!

Pear and parsley are the perfect combination for a quick and healthy juice but since I had apple and mandarin orange in hands, I have added them into the mixture before they are rotten. 

– – – – – – – – – – – – – – – – – – – – – – – – – – – – – – 

Servings: 1-2 

Ingredients:

  • 1 red apple, cut into pieces
  • 1 pear, cut into pieces
  • 1 ripe mandarin orange, peeled
  • Parsley leaves (Quantity depending on your preferences)
  • 5cl of water

Preparations:

1. Into your blender or mixer, blend all the ingredients. Do not strain the fibers, pour the juice directly into a glass and serve. 

Gratin Pattypan Squash with Cheese

20180114_181813

I love the aroma of baked gratin with cheese, out from the oven. This recipe is so healthy and rich in flavour, it can be served with bread, grilled or roasted chicken, fish or meat and a good salad. You can try the same recipe with potatoes and even chayote (chouchou). Give this recipe a try, it is so comforting and warm during winter.

– – – – – – – – – – – – – – – – – – – – – – – – – – – – – – 

Servings: 4

Ingredients:

  • 2 large yellow pattypan squash
  • 1 tsp grated garlic
  • 1/2 cup  grated chedar cheese
  • 5 cl of milk
  • 2 cl of fresh liquid cream
  • Thyme leaves
  • Parsley leaves
  • Salt and pepper

Preparations:

1. Boil the whole pattypan sqaush in a pressure cooker on medium heat for 10 minutes.

2. Preheat a pan with vegetable oil. Meanwhile get rid of the skin and mash the cooked pattypan squash. 

3. Once the oil starts to sizzle, add the grated garlic and the mashed pattypan squash. Cook for 2 minutes on medium heat and add the milk, lid covered on for 5minutes.
4. The grated cheese goes in with the thyme leaves for 2 minutes, without lid. Season with salt and pepper, be careful while adding salt because the cheddar cheese contains a good amount of salt. Stove off.

5.Preheat your oven at 180C. Add the cooked gratin pattypan squash into different tiny bowls, top them on with heavy liquid cream evenly, and more grated chedar cheese. Bake for 5 minutes until cheese has melted. Garnish with parsley leaves and serve with bread.

Latte


It’s been a cold winter this season! Everyone hearts for a warm cup of tea or coffee in this weather. I have the perfect home-made latte for you without using any fancy equipments! Become the artist of your own latte art which I have filled with the foam! My cup definitely does not define to that of a fancy pinterest latte cup but impromptu is always the best. 

– – – – – – – – – – – – – – – – – – – – – – – – – – – – – – 

Servings: 1

Ingredients:

  • 3/4 cup of espresso or instant coffee (if you don’t have espresso)
  • 1/2 tsp sweetened cocoa powder (optional)
  • 1/2 cup of milk

Preparations:

1. Heat milk on medium heat for 1 minute until bubbles hit the surface.

2. To froth the milk, use an electric whisker and whisk until it reaches desired frothiness. You can also use a blender or an immersion blender or even a shaker (shake for 10-20 seconds if you are using a shaker).

3. Pour espresso or coffee and cocoa in a cup. Pour the warm milk and use a large spoon to hold back foam. Spoon and decorate your latte on top with the amount of foam your heart desires.